| з”Ё MatWeb зҷ»е№ҝе‘Ҡ! | ||
| и¶ҠиҝҮ59,000 д»ҘдёҠ, йҮ‘еұһгҖҒеЎ‘ж–ҷгҖҒйҷ¶з“·е’ҢеҗҲжҲҗзү©зҡ„ж•°жҚ®иө„ж–ҷеә“гҖӮ | ||
|
дё»йЎө • жҗңеҜ» • е·Ҙе…· • дҫӣеә”е•Ҷ • ж–Ү件еӨ№ • жңүе…іжҲ‘们 • еёёз”Ёй—®йўҳ • зҷ»еҪ• • |
||
| | | | | | |
|
||||
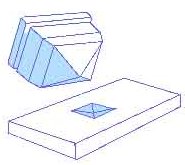
Vickers Hardness TestingMicrohardness testing of metals, ceramics, and composites is useful for a variety of applications for which 'macro' hardness measurements are unsuitable: testing very thin materials like foils, measuring individual microstructures, or measuring the hardness gradients of a part along the cross section. Microhardness testing per ASTM E-384 gives an allowable range of loads for testing with a diamond indenter; the resulting indentation is measured and converted to a hardness value. The actual indenters used are Vickers (more common; a square base diamond pyramid with an apical angle of 136°) or Knoop (a narrow rhombus shaped indenter). The result for either Vickers or Knoop microhardness is reported in kg/cm2 and is proportional to the load divided by the square of the diagonal of the indentation measured from the test. The figure below, courtesy of NewAge Instruments, shows the Vickers indenter geometry.
The load on the Vickers microhardness indenter usually ranges from a few grams to several kilograms. In contrast, 'Macro' Vickers loads vary from 1 to 120 kg. The indentations should be as large as possible to minimize errors in measuring the indentation (hence the reported hardness). Vickers hardness is also sometimes called Diamond Pyramid Hardness (DPH) owing to the shape of the indenter. The test samples should have a smooth surface and be held perpendicular to the indenter. All things being equal, a lighter indenter load will require a smoother surface for a satisfactory test. Samples are usually mounted in plastic to fix them during preparation and testing. Other hardness topics in MatWeb: |
|
и®ўйҳ…зү№зә§жңҚеҠЎ й«ҳзә§е…Ҳиҝӣ • жһ„жҲҗд»Ҫ • зү№жҖ§ • жқҗж–ҷзұ»еһӢ • еҲ¶йҖ е•Ҷ • е•Ҷж Ү • UNSеҸ·з Ғ е№ҝе‘Ҡ • йҖ’дәӨиө„ж–ҷ • иө„ж–ҷеә“и®ёеҸҜиҜҒ • зҪ‘еқҖи®ҫи®Ўз®ЎзҗҶ • дәӨжҳ“еҸ‘иЎҢ дҫӣеә”е•ҶеҗҚеҚ• • еҚ•дҪҚиҪ¬еҸҳ • еҸӮиҖғ • ж–°ж¶ҲжҒҜ • й“ҫжҺҘз«ҷ • еҚҸеҠ© • йҖҡи®Ҝ • зҪ‘еқҖеӣҫзӨә • еёёз”Ёй—®йўҳ • дё»йЎө |
||
| иҜ·иҜ»е…ідәҺжқҗж–ҷж•°жҚ®зҡ„дҪҝз”Ёи®ёеҸҜеҚҸи®®е’ҢжҲ‘们зҡ„йҡҗз§ҒжқғгҖӮиҜўй—®жҲ–иҜ„и®әжңүе…і MatWeb? иҜ·дёҺwebmaster@matweb.com иҒ”зі»гҖӮжҲ‘们ж„ҹи°ўжӮЁеҜ№ MatWebзҡ„еҸӮдёҺгҖӮ
жң¬з«ҷзӮ№з”ұ Automation Creations, Inc. и®ҫи®Ўе’Ңз»ҙжҠӨгҖӮиҝҷдёӘзҪ‘з«ҷзҡ„еҶ…е®№, MatWeb зҡ„е•Ҷж Ү,дёҺ "MatWeb" з”ұ Automation Creations, Inc.зүҲжқғ1996-2006жӢҘжңү гҖӮ MatWeb ж„Ҹж¬ІдёәдёӘдәәдҪҝз”Ё , йқһе•Ҷдёҡз”ЁйҖ”гҖӮиҝҷдёӘз«ҷзӮ№зҡ„еҶ…е®№гҖҒз»“жһңе’ҢжҠҖжңҜж•°жҚ®,жңӘз»Ҹз”ұ Automation Creations, Inc. е…Ғи®ё, дёҚеҸҜд»Ҙиў«з”өеӯҗ,ж‘„еҪұжҲ–е®һиҙЁдёҠең°еҶҚз”ҹдә§жҲ–иҮӘеҠЁеҢ–еҲӣдҪңгҖӮ |
||
